WordPress Settings Menu Lesson 7
Setting:
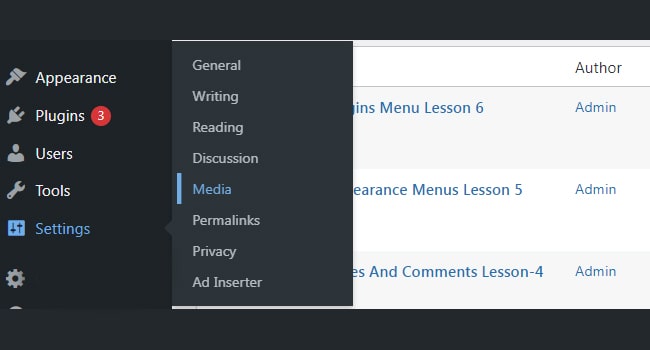
In WordPress the dashboard of the website has an icon for the setting. This setting button set different things from this after clicking just as general setting, writing, reading, discussion, media and permalinks.
General setting:
After clicking the setting, there is page for general setting and it controls different types of setting for the admin. The general setting, page has the followings few basic fields and headline through those admin can set website setting according to his desire.
The followings are few main headlines in general setting page.
1. Site Title:
This show the name of your website in the website header.
2. Tagline:
It gives you a single statement or line for your website.
3. WordPress Address (URL):
It is the place where all your website files and applications are stored.
4. Site Address (URL):
It is the name of your website that you want to show on the browser.
5. E-mail Address:
It require your email address through that you will recover your password or required update.
6. Membership:
The website readers can create or register an account on your website.
7. Timezone:
This is field where admin can set time of his region that will display on the website.
8. Date Format:
This is place where admin can adjust data and it will display on his website.
9. Time Format:
This for the setting of time and it will show on the website.
10. Site language:
There are numbers of languages on the dashboard and you can select the language for this icon.
The admin after filling out all the field of the general setting then click the save change button.
Writing setting:
This icon in the setting for writing setting offers different options for WordPress setting. This feature is used for editing posts, pages, post through email and other updates. The admin can easily reach in this platform by clicking the setting and then writing option.
The followings titles are there in the writing setting.
1. Formatting:
This are offers two types of option like Convert emoticons and P to graphics on display. Moreover, it also corrects the invalid XHTML in the posts or pages.
2. Default Post Category:
It indicate your post relevant category, but it admin can leave the post without any category as Uncategorized.
3. Default Post Format:
In this field admin can create different format of posts or develop separate styles for each post.
4. Post via e-mail:
In this setup email address is used for the creation and publishing of post on your blog.
5. Mail Server:
It permit the reading the email that is form your side to WordPress.
6. Login Name:
The develop post in the WordPress you require an Email and for that you must have login Name.
7. Password:
The above email also need a valid password for that.
This section also need to save after making changes in the writing area.
Reading setting:
In reading setting you need to visit setting and then land on the reading area of your website. The following headlines will appear on the reading page.
1. Front page displays:
It indicates and show the front page of the followings icon.
2. Your latest posts:
It exhibit the current posts on the front page.
3. A static page:
It shows the static page on the front page.
4. Front Page:
From this are admin can pic the right page for the display from the drop down.
5. Posts Page:
From here the admin can select the page from the drop down that contains posts.
6. Blog pages show at most:
It allow the admin to show number of posts per page or website.
7. Search Engine Visibility:
This filed is for the search engine visibility or not visibility.
The admin after making changes in this section will click the save button for saving reading setting.
Discussion setting:
In this section the admin and visitors interaction each other. The admin has full control over the material that come from the visitors side. The admin clicks the setting button and then land in the discussion area in WordPress.
This has the followings fields for setting.
1. Default article settings:
This area is for the creation of new posts or page in the website.
2. Other Comment Settings:
It has various other option like.
3. Comment author must fill out name and e-mail:
It is for the visitors or readers to add their name and email address.
4. Users must be registered and logged in to comment:
In case of checking this box only registered readers or visitors will leave their comments.
5. Automatically close comments on articles older than days:
It permit the admin to receive comments for specific time.
6. Enable threaded (nested) comments:
On checking this option the visitors can reply or make discussion.
7. Comments should be displayed with the comments at the top of each page:
In this section webmaster or admin can arrange comment in ascending or descending order.
8. Email me whenever:
The admin will receive email through single comment.
9. Comment Moderation:
In this section admin can allow the limited number of comments from the visitors.
10. Comment Blacklist:
In this are the admin can block the email, comments from the visitors.
In the last after making changes in this section you have to click on the save button for save changes.
Media setting:
In this area of the dashboard the admin can make different changes in the media like increasing or decreasing the size of the images those are used on the website.
The admin can make the following changes in this setting area.
1. Thumbnail size:
From here the admin can give the size to its images used in the website.
2. Medium size:
It give the facility to arrange or set the height or width of the medium images.
3. Large size:
it is for the large images to adjust according to the desire.
3. Uploading files:
After checking this box the images will be arranged according to year and month basis.
In the last after making changes in this section you need to click the save button for setting saving.
Permalink:
In permalink setting you can make permanent link the posts, blog or category of your website. The default setting allow, the users to add permalink to your posts in the WordPress. The admin or webmaster after reaching the setting then click the permalink and the page will appear that contains different followings options.
Common settings:
The followings are few important options in this permalink setting.
1. Default:
It creates default setting in the WordPress.
2. Day and name:
It set the URL setting according to the date and name of the posts.
3. Month and name:
It make the setting of URL according to the month and the title of the post.
4. Numeric:
It add numbers in the URL structure in the post.
5. Post name:
It insert the post name or title in your post.
6. Category Base:
It will add custom prefix for your category URL. 7. Tag Base:
It will add custom prefix to your tags URL.
After making changes in this section the admin must click on the save button for save changes.
#best online web design courses #FREE Web Design Course 2021 #how to learn web designing #how to learn web designing step by step pdf #html codes for websites design #html web design pdf #Introduction to Web Development #Learn Web Design with Online Courses and Classes #online web designing course #Responsive web design tutorial step by step for beginners pdf #TOP 10 BEST FREE WEB DESIGNING COURSE #web design and development pdf #web design course pdf #web designing course in Pakistan #web designing course online #web designing course online free in hindi #web designing course online free youtube #web designing course syllabus #web designing tutorial #web designing tutorials #web designing tutorials free #web designing tutorials pdf